Archive for August, 2011

Hat Finished! (At Least This Version Is…)

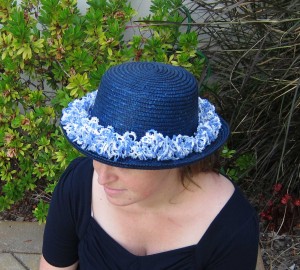
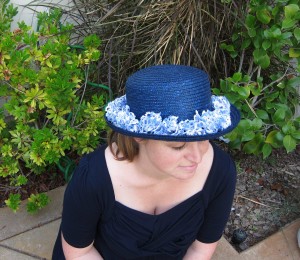
I am back in San Diego now (until September 5th then I head back up to Seattle) so I’ve had a chance to finish off the hat I wrote about earlier.

To keep the tatting more compact while I was making it I strung a thread through all the rings of the first row in this edging.  To put it on the hat brim I did the same thing, but measured out the thread to fit around the hat and then tied the ends together to make a circle of tatting.

I didn’t really do much to attach it to the hat, just a quick go around with thread alternating between the hat and the tatting while trying to keep the tatting as evenly spaced as possible.  I’m not too worried about it falling off since the hat brim turns op around the edge, so I figured a quick go around would take care of it.

I’m still on the look out for a big sun hat that’s calling out for a piece of ruffled white and blue lace.  When I do find something like that I’ll just cut the thread that runs through the middle of the tatting and redo it on the new hat.

Comments (2)

Oh. Ok. Now I get what all the fuss is about…

One of my first posts when I started this blog was about how pleased I was when I took my printed copies of the PDFs of the Priscilla books (available online at the Antique Pattern Library) in to have them bound.  Sure, it was just a cheap spiral comb binding, but it was so nice to have them all bound and looking like real books.  Something about the transition from a stack of papers to a bound collection made them seem like a more real collection of patterns.  Just printing them had also helped, but this furthered the feeling even more.

I love all the patterns available on the Antique Pattern Library but having them in PDF form isn’t the most easily browse-able.  It was nice to have the Priscilla books in a printed form I could curl up on a couch with or pull out of a bag to show someone what I was working on.  I downloaded to my computer and debated printing more from the Antique Pattern Library, but unless I knew it would be a book I would be working from a lot I didn’t really want more things printed.  Of course, having them sit on my computer as non-browsing-friendly PDFs means that it’ll be a long time before I get around to browsing and discovering the patterns that make printing and binding the books worthwhile.

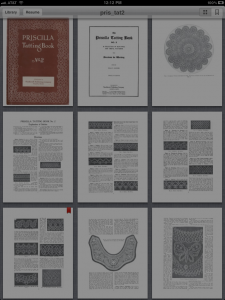
Enter the iPad.  Oh glorious day!  I can’t tell you how excited I was to upload all the Antique Library PDFs I had on my computer to iBooks on the iPad.  It’s pretty ridiculous the joy it gives me to see the books lined up digitally in one place like this.  Don’t they just look so pretty in the picture above.  And so easy to browse.  With the old printing of the Priscilla books I’m especially enjoying being able to zoom in easily.  I like the bookmark feature, but my only complaint is that I can’t add notes to the bookmarks.  My paperbooks are covered in sticky notes that not only mark the patterns that I want to come back to, but also let me know what I was thinking of doing with the patterns.

The iPad I’m using is a friend’s old iPad 1 that I’m just borrowing to decide if I want to get one of my own.  I have to say that just for the excitement of having all my PDFs in one place it’s looking like it’s worth it.  The only problem with the iPad 1 is that it doesn’t have a camera.  I was thinking it would be awesome to be able to take pictures of the pages of other books I own so that I would always having the patterns I’m working on with me.  I could always take the pictures with my regular camera and upload them, but that’s more steps and more steps means less likely to actually happen.  :)  I suppose that’s technically against copyright laws, but it would be for personal use of books that I already own.

Didn’t mean for this to turn into a commercial for the iPad, but the whole concept of being able to browse my entire pattern library from one device is sort of blowing my mind.  Yes, that’s right.  I’m finally stepping into 2010.

Comments (2)

Second Connector Piece Done! (Finally!)

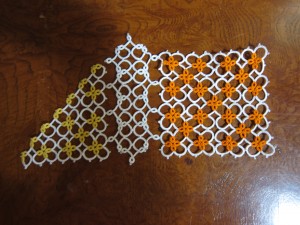
My plan had been to do the second connector piece for the sample shawl over the weekend but twice I managed to mess it up badly enough that I had to cut off big chucks.  The first time I joined the piece to the wrong side of the square, but I didn’t realize it until I got to the point where I was about to start joining it to the second triangle.  So I cut off everything and started over.

The second time I got the square part right, but I shifted all the joins on the triangle side over.  Both the triangle and the square have a series of open picots on the sides that are joined to the connector, but I only need to use every other one.  Unfortunately I started off with the wrong one when connecting the triangle piece.  (Nevermind that I had done it right the first time and had that right in front of me as an example.)

What was particularly annoying was that I didn’t discover these mistakes until I’d tatted the entire length of the connector so I ended up having a lot of wasted tatting.  Oh well.  I guess that shows what a good idea it was to be making this little sample piece rather than trying it out on the actual shawl pieces.

Comments (2)

First Connector Piece Done!

In the interest of keeping the pain in my wrist down I haven’t been doing much tatting this week.  I’ve been REALLY wanting to pick up the shuttle and thread, but I decided that all I would allow myself to tat this week was this, the first of the two connector pieces for the shawl.  So far it looks good, though there wasn’t really any chance of this part not working.  The problems will come up when I put the next connector on and then try to do the edgings around the whole thing.

Sorry for the boring post.  Not much to report this week tatting-wise.  Just trying to keep it easy on my wrist.  I’ll probably tat up the second connector this weekend and get started on the border next week.

Comments (3)

Ready to Start Experimenting

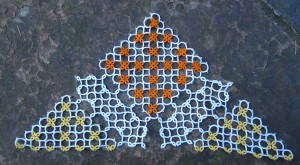
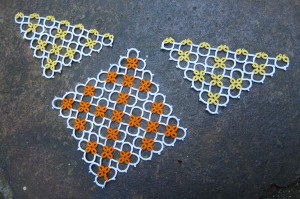
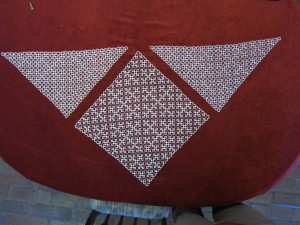
This weekend I tatted up the three base pieces of what I’ll use to figure out how to piece together the shawl.  At first I was finding this little piece of the project depressing because it meant about 6 hours of tatting before I would actually be able to play around with the edging ideas I’d come up with on the computer.  And then it will be hours of tatting trying out the edgings and connectors trying to find something that works before I can even START work on the actual shawl.

So I was a little disinclined to actually start tatting this.  I kept thinking “This is going to be hours and hours of tatting and in the end I’ll know how to do the edgings and the connectors on the shawl, but all I’ll actually have to show for it is a little mini-shawl.”

But I knew it was something that would have to be done to put together the big shawl so I forced myself to get the first little triangle panel tatted.  By the time I finished that I was totally over the whole pseudo-depression about having to do a whole bunch of tatting before actually being able to put together my shawl.  As soon as I had something physical in my hands I was thinking “Awesome!  When all this is done I’ll know how to do the big shawl AND I’m going to have a little mini-shawl that I can use to more easily show other tatters how great this little motif is and all the cool ways you can use different versions of it in the same piece!”

That’s always the case for me.  When designing it takes me a while to actually get started with the tatting because it’s depressing to know I’m going to end up doing a lot of tatting that doesn’t end up working, but once I actually get started and have a piece of lace I get all excited about the project again. 

So this weekend I finished off all three panels.  These are the smaller equivalents of the pieces of the big shawl.  Next step is to take my diagrammed out ideas and start tatting.  Hopefully they’ll all fit together nicely without out too much cutting and re-tatting.  🙂

Leave a Comment

Hat Brim (Tatting) Finished!


I know it looks pretty much identical to the last picture I posted about this project, but now it’s actually done.  That’s the problem with a project this dense.  It took a TON of tatting to feel like I was making any progress on it.  That was fine when it was the tatting I worked on during class but when I decided to just finish it up I was thinking I only had 2 or 3 hours of tatting left on it.  Turned out to be about 3 times more than that, but it’s done now and I like the way it came out.

I strung all the rings of the first row on to a thread so I could keep them bunched up.  That made it easier to move around, but that’s also what made it feel like I was going so slow.  I only had 6 inches left, but those were bunched up inches so they were really a couple feet.  The whole thing was maybe 2 feet bunched up, and about 6 or so in reality.

The next step is a bit of light sewing to attach it to the hat.  Unfortunately, the hat is in San Diego and I’m in Seattle for another two weeks so it’ll be a while before I get to that.  I’m excited to have the tatting for the project done though.  It’s been at least 6 months since I started it.


Leave a Comment

Possible Solution for Putting Together the Shawl

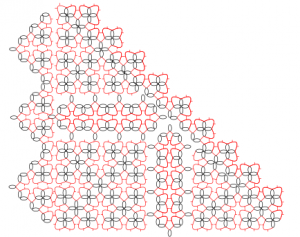
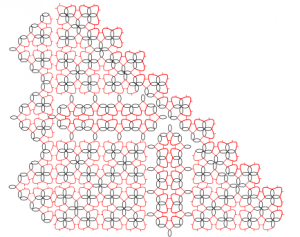
In my last post about the shawl, I ended with the plan to play around with the pattern on the computer and see if I could come up with a way to connect all the pieces without actually picking up any shuttles or thread.  Had a flight from San Diego to Seattle on Monday (Oh… Hey Seattle people!  I’m in town till the 25th!) and had a chance to play around a bit.  It might not make sense to anyone else, but I’m going to post it anyway.  Here’s what I came up with.

There’s actually two triangle pieces and the square piece in there.  They’re connected by two stripes which are made from a doubled-over edging variation on the same pattern.  On the long side (diagonal from top left to bottom right) is another edging.  This will actually be the top part of the shawl.  On the left side is another fuller edging.  Though I didn’t add it, this edging will be repeated on the bottom part of the picture.  These two pieces are the edging around the two bottom parts of the shawl.  (This picture is 45 degrees off from the final shawl.  It was just easier to build the pieces that way.)

You might notice that the pieces that make up the three panels of the shawl are no where near as large as they are in real life.  This was done on purpose because it didn’t make sense to diagram out the whole thing when I’m only interested in the corners and the connecter pieces between the panels.  I just made smaller versions so I could more easily move them around and could see the whole thing on the screen at once (and at enough detail that it would make sense.)

So will it work?  Well… Good question.

I think it mostly will, but because my drawings aren’t as precise/even as the actual tatting will be, I won’t be totally sure how it will fit together until I try it.  I’m definitely closer to having something that works so I think playing around with it on the computer was a very good and time-saving exercise.  I’m pretty sure that this will be the basic idea but the final version will still have a bit of tweaking.  I’ll have to work out that part out with shuttles and thread.

The BIG difference between the diagram and the real thing is that this diagram COMPLETELY mis-represents the sizes of the connectors in comparison to the panels.  In the diagram, the large square is 2 motifs by 2 motifs.  In real life, it’s 8×8.  So the connectors and boarders won’t look anywhere near as large on the final version.  (I’m hoping that will also draw attention away and help to smooth out any rough edges/connections.)

In fact, when I actually get started on the final piece, I may decide that the connectors and the boarder need to be bigger.  After all, the two reasons I’m putting them there in the first place is to make the whole shawl a little bit bigger and (more importantly) to give a piece of white between the different-colored panels to make for a nicer transition between them and to have a piece of white around the piece as a whole to pull it together better.

Luckily, that’s something that can be easily adjusted later.  Once I know how the actual pieces will fit together it’s not very difficult to change the sizes.  As long as the edges of the connectors are the same I can make them pretty different from what’s currently there.

So, the next steps?

Well, next I have tat what’s on the diagram.  I don’t want to try it on the actual piece, partly because I don’t want to stretch out picots by joining something I may take off (and if I’m going to have to cut away what I’m tatting now, I don’t want to end up accidentally cutting the actual piece.)

Mostly though, I just don’t want to have to that much for a trial run.  It’ll be better to try it out on a smaller piece.  If the corners aren’t going to work together the way I think they are, I don’t want to have tatted up a foot and a half of the edging just to get from one corner to another.

So now I put aside the three panels I have finished.  Pull out some size 10 thread (the actual piece is in size 20) and tat up three new much smaller panels.  I’ll play around with the edgings and connectors on these pieces and will hopefully get something that works.  Stay tuned!

Leave a Comment

Teaching Beginning Tatting

Tomorrow will be my first day teaching tatting classes at Piecemakers in Costa Mesa.  I’ve taught classes and I’ve taught beginners before, but this will be my first time teaching a beginning class.  I’m looking forward to it.  I have 7 seven students.  Originally I had capped it at 6, but they had someone ask to be a part of it last week and I said sure.  Should be an interesting day.  I hope it goes well. 

I’ve been sick this last week and am finally feeling better today so I’m just getting around to finishing up all stuff for tomorrow.  I’ve got samples in size 10 (the size we’re going to work with in class), but I want to make a couple more in size 3 so they’ll be easier to see.  Also need to try to find some rope so I can make some super large samples.  I’m starting them off in size 3 with the very basics (I always teach chains first so the students can use two different colors and if they make a mistake it’s not such a big deal), and then we’ll move on to a basic ring and chain circular motif and a simple trefoil edging.

Meant to post something about it yesterday, but didn’t really manage to do anything other than nurse the cold/headache.  Anyone have any last minute advice for teaching a group of newbies?  We have a 6 hour class, so it should be plenty of time for everyone to get the hang of the basics.  This is the first of a couple beginning classes that I’m teaching, so leave a comment even if it’s long after I originally wrote this post.  What do you wish someone had told you when you were just starting to learn tatting?

Comments (7)

Mystery Project

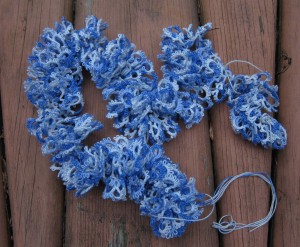
As usual I have been flipping between projects so it should surprise no one that I haven’t done anything new on the big projects that my two previous posts were about.  Still been tatting, of course, and here’s what I have been doing:

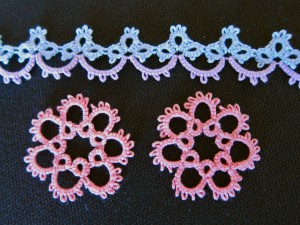
So what is it?  Well, I’m not sure.  I started it with one purpose.  Hit a snag and decided that it would be something else.  Now I’m going back to the first.  Physically, it’s a very long piece of a very ruffled edging.  Here’s a close up:

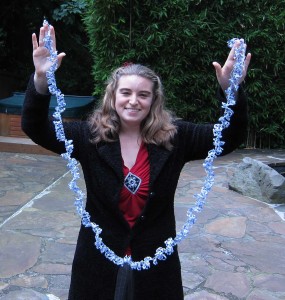
I’m not actually sure how long a piece it is.  For the original plan I didn’t need an exact length because the whole thing was going to be bundled together for an ruffle-y effect.  So I just tatted up a long length of R3+3-3-3, CH4-2-2-2-2-4.  I ran a thread through all the rings so I could keep in all contained while tatting the second row which is the same as the first, except that the rings are R3-3+3-3, joined at the bottom of each ring to picots 1, 3, and 5 of each chain instead of to the previous ring.   (So the 3 rings on the second row for every ring on the first row.)

I’m doing a masters degree in accounting and I worked on this project a lot while in class.  It was just the perfect project for class in that it kept my hands busy and gave me something to do, but was simple enough that it didn’t actually take any concentration.  PLUS because the final piece was going to be so ruffled, it didn’t matter if I made a mistake because you wouldn’t be able to see it.  There’s a few 3+3-3 rings in that second row.

Because it worked so well as a project for class, I’ve been saving it for class and when I had a couple months off from class I forgot about it, even though I’m actually getting close to the end.  Like I said, my original plan for what to do with it had hit a snag so there’s been no push to finish it and I didn’t really notice that I had stopped working on it.

The original plan was to use it on this hat frame:
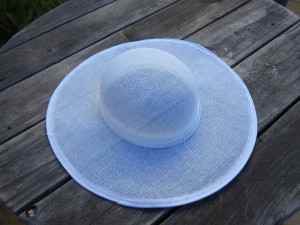
I picked up the frame at the awesome millinery store in downtown LA.  I have dreams of one day figuring out a way to cover it with a cool single layer/flat piece of tatting, but right now the various curves of the hat have me thinking that kind of a project would take a LOT more time to design than I want to put in right now.  So I thought a cool ruffled edging around the whole thing would be good enough for my “first” hat.

Until I was about half way through the tatting it never occurred to me that this is a hat FRAME and I’d have to figure out some way to cover it.  Um… Yeah…

For those who don’t know me, I am not a sewer.  I think it’d be cool to know how to sew things and cover hats, but I’m just not willing to put in the time it would take to learn to sew.  I just don’t think I would enjoy it as much as I enjoy other things that I’d rather spend my time on.  (Like tatting.)

So about half way through an extremely large piece of lace I realized that when I finished it I’d probably just put it next to the hat frame and forget about it for a few years.  Not a big loss, because it IS the perfect project to work on in class so if nothing else it’s helped me concentrate during lecture.  (My mind focuses much better if my hands have something to do.)  So I kept working on it, settling on the idea that maybe I’d end up using it as an edging for a dress or skirt or something.  I don’t have a skirt or dress that it would work with, but maybe by the time I finished it I would…

Anyway.  I’ve had a couple months off from classes so I set it aside and forgot about it until I stumbled on it a week or two ago.  I probably only had another shuttle-full left on it so I started it up again in the interest of actually finishing some of my big projects.  I figured I’d finish up the tatting so that I’d be ready to sew it on when I found the right dress/skirt.  Then just yesterday mom gave me this:
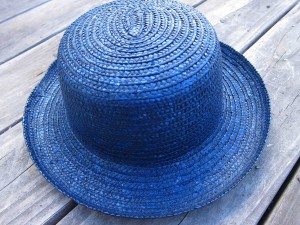
Not quite the wide brimmed sun hat I had originally envisioned, but the colors match and it’s already covered.

Looks pretty good, huh?  Only problem is that now I’ve grown sort of attached to the idea of a ruffled edging along the bottom of a dress or skirt.  Guess that as soon as I finish this one I’d better get started on another…


Comments (3)