Progress on the Star Doily
 I’ve made a bit of progress on the star doily in the last couple days. Here’s the post about the original motif.
The new part in this project is the small motif used to fill the space between the larger motifs. As written the pattern says to make the four motifs and then make the small motif, but it seemed a lot easier to make two of the large ones, then do the little one and then another two large ones. Filling in small spaces just isn’t my idea of fun tatting. Too fiddle-y.
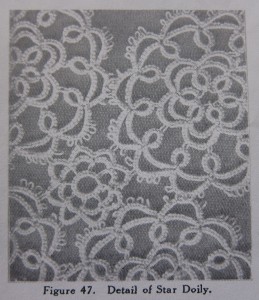
I made a second motif joining it to the first on the final round by the middle 3 of the 5 picots on an outer chain. The book didn’t actually say how to do the join and from the look of the picture to the left I couldn’t actually tell how the original was joined, but I figured 3 joins would make it nice and strong.
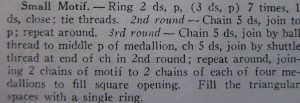
I think the small motif would make an excellent small pendant or a pair of earrings. Actually the center part of the large one would as well. I’m adding these to my list of things to try when I have time. The small motif is a fairly straight forward one. My only slight confusion was to the first (and only) ring. They call for you to tie the threads, but don’t say to cut. Presumably they intended for you to cuqt them since that seems to be what was common at the time and they don’t then have you joining the thread to the first picot as I’ve seen them do.
Anyway, it’s a small matter because I just started the ring at a picot and left the shuttle on the ball. After closing the ring I made a mock picot after the ring by not flipping the first half of the first stitch of the first chain. (Wow, three firsts in one sentence.) That seemed to do the trick as far as making sure there was a mock picot between the ring and the chain.
Here are the instructions as I did them (These instructions are for the motif alone. For joining them to the large motifs you’ll just have to look at the picture above. I can’t figure out how to explain where to make the joins and it’s one of those cases where a picture is worth a thousand words.):
R 3(-3)x7 (picots should be fairly long)
Leave space on threads after the ring of the same length as the picots.
*Ch 5, leaving the first half of the first stitch unflipped.
Shuttle join to next picot
Repeat from * 7 times around the ring.
Round 3:
**Ch 5-5 (joining were necessary to the large motifs previously made)
Shuttle join to top of next join on the previous round
Repeat from the ** 7 times. Hide and cut ends.
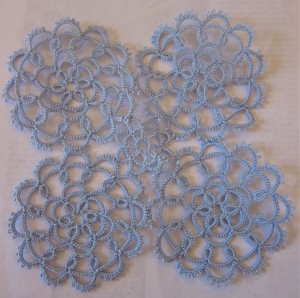
Not too bad for a little motif. I discovered after the second round that I’d made my ring picots just a little bit too short so it didn’t lie as flat as I’d like. I’ll have to keep that in mind when I do the next 4. Otherwise it came out pretty well. I should have taken a picture after I finished the small motif but I forgot to do it until I’d finished another two of the large motifs and joined them to the group. Here’s where I’m at this point:
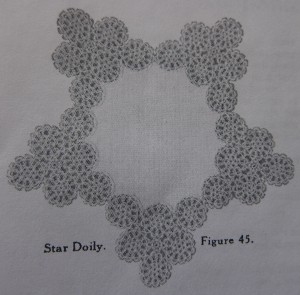
And here again is what the finished doily will look like:
I can’t believe I’m actually making a doily. I never thought I was that kind of tatter… ;) Though I’m using size 10 thread so I think it’s going to come out pretty large. MAYBE even large enough I can call it a tablecloth. That seems more respectable than a doily.


Gina Said,
January 21, 2011 @ 7:57 pm
I agree that you should tat the small motif before moving on to large motifs 3 & 4. That would be so much easier. Makes you wonder if the small motif was an afterthought? Did the designer decide there was too much negative space?
You might try putting your fine crochet hook through the small picots and stretching them a bit but I think the tatting will lay flat once it’s blocked.
I’m curious. The last line of the directions says to fill the triangular spaces with a single ring. I can’t see the doily well enough really in figure 45 but it does seem there is a triangular space between where the two large motifs are then attached to one large motif. I’m trying to imagine tatting that single ring. I bet you could throw a ring off the chain and attach it to the 2 large motifs at the same time. Is this another place where the designer didn’t like the negative space? I might leave it out myself.
admin Said,
January 21, 2011 @ 8:48 pm
I think the little ring was definitely just an afterthought, but that without the small motif the negative space would definitely be too large and make the piece too floppy. It needs something in that space. The single ring to fill that small a space is too much though. I kinda like that bit of negative space.
That’s a good idea about throwing the ring off the chain to make it though. I hadn’t thought of that. I wasn’t planning to put it in at all, but that would have been an easy way to do it. Hopefully not having it there won’t make the piece too loose, but it seems to be fine without. If I’d thought of just throwing it off the chain though I probably would have included the ring. Thanks for the good idea!
Fox Said,
January 22, 2011 @ 10:11 am
Maybe the small one was tatted after, because in the original, she would not have known how big that space was till at least two of the larger ones were joined. That makes sense intuitively to me… which means nothing! Just a thought about the ‘why’ of it!
Fox : )
admin Said,
January 22, 2011 @ 10:37 am
I think you’re right and that’s how it was designed, but for actually tatting it from the pattern it doesn’t make sense to do the 4 large ones and then the small one. Doing the small one first or after the first two is a LOT easier.
Sue Said,
January 24, 2011 @ 10:21 am
That is looking great! I can’t wait to see the finished project! 🙂
admin Said,
January 24, 2011 @ 11:30 am
Thanks Sue!