Rose Motif (From Hell)
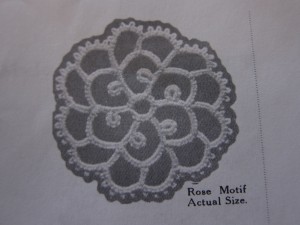 I’m also working on a large piece from the Priscilla books which is an easy pattern but which I’ve chosen to work up in a rather large project. So I wanted to do a fairly easy pattern for today that wouldn’t take up much time. Since the leaf motif came together so easy on Tuesday I thought I’d do the pretty little rose that goes with it.
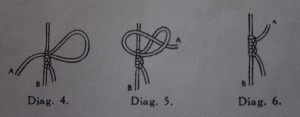
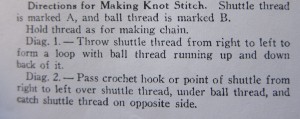
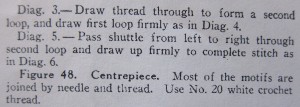
Yeah, that didn’t work out as well as I thought it would. This unassuming little rose was more complicated than I expected. You see, this rose is the introduction to something Priscilla calls “Knot tatting.” It’s basically their version of the split chain. Here’s the pictures and written instructions for it, “A” is your shuttle thread, “B” is the ball thread or the thread you are covering:
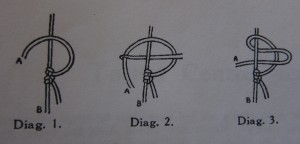
I have no way of knowing, but I suspect the usual split chain must not have be around when this book was written in 1924 or else they would have shown that. This is a cool little knot. Unlike the split chain which is done in two passes (you have to pull two loops through the space to create the finished knot) this one only takes one pass so it’s a bit easier and faster to make. The big difference is that the split chain ends up looking like the normal tatting stitch, where as this one doesn’t. Also, with the split chain the threads that wrap around the core thread fall into place naturally as you do the knot. With Knot Tatting you have watch and guide them into place a bit more. It’s slightly easier for it to get unruly.
Each one of those “spokes” on the rose is made up of a series of these knots. About half way through I was frustrated and sick of them, but by the time I finished I’d gotten a little more comfortable with doing them and I was so pleased with the way it looked I’m sort of ready to try another. Maybe not right away though. Here’s the instructions for the rose.
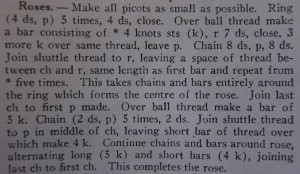 I recommend starting with the Continuous Thread Method (CTM).
R 4(-4)x5
Second round:
Over the ball thread, do 4 knot stitches (I’m calling them ksts in these instructions)
R 7
Ch 3ksts over ball thread leave picot, Ch 8-8
*Join shuttle thread to next picot on center ring leaving space.
Ch 4ksts
R 7
Ch 3ksts, pick up ball thread, leave picot, and Ch 8-8*
Repeat between *’s around the center ring then join to picot at top of first spoke.
Third round:
Ch 5ksts over ball thread, leave picot, Ch 2(-2)x5
**Join shuttle thread to next picot on round 2, leaving space.
Ch 4ksts, pick up ball thread and Ch 2(-2)x5
Join shuttle thread to next picot on round 2, leaving space.
Ch 5ksts, pick up ball thread and Ch 2(-2)x5**
Repeat between **’s around. You’ll be making 4ksts on top of all picots in chains and 5ksts on top of all picots above spokes. Join to picot at top of first spoke.
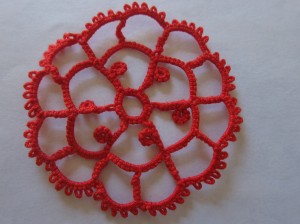 WHEW. It won’t really make sense until you try it, but hopefully it’s sort of clear once you’ve got thread in your hands. It took me quite a while to get this little rose finished, but by the time I did I was getting more comfortable with the knot stitch. In the first round I was getting a bit frustrated with the way it was coming out because I was having trouble keeping it even, so I did a couple spokes in the normal split chain to compare them. The knot stitch is faster, but a bit harder to keep even. This little rose certainly gives you plenty of practice with it.
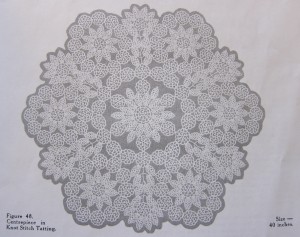
This rose and the leaf motif from Tuesday are part of a large centerpiece. The final piece has 109 rose motifs. 109! That works out to about 9,000 knot stitches.
I don’t know if I’m up for doing that many. I might decide that life is just too short to spend my time doing knot stitches, but I do really like the way this rose motif came out and do like the little leaves. Maybe I’ll just do a couple of smaller pieces with just one rose and the leaves around it. Here’s the full centerpiece. Enjoy it now, it might be the only time you see it on my site.Â


Fox Said,
January 17, 2011 @ 5:43 am
Oh, yes – the Rose Motif from Hell is aptly named!
I have tried the knot thing a gazillion times and cannot understand the directions. I finally tore up my scan of the pattern and threw it away so I didn’t have to confront it when I went through my pattern binder!
Now I have a real block against the instructions and when I saw your rendition I was sad! Maybe I will have to try again!
Nice work! (*SOB*)
Fox : )
Fox Said,
January 17, 2011 @ 5:54 am
Two minutes later:
Well, what was the fuss all about, I wonder! I am now able to knot this little stinker!
Thank you for your post. I do not know what the magic is, but I think I will be able to tat this pattern now! I am so pleased! Have a great day and thanks again!’
Fox : )
admin Said,
January 17, 2011 @ 7:11 am
Haha! You must have been unconsciously working on it all this time. Glad it finally worked out for you! It does come out to be a pretty cool pattern. I like how airy the finished piece looks because of all the chains, but they sure are annoying to tat.
Fox Said,
January 18, 2011 @ 5:41 am
Hi again!
I have almost finished it! I cannot thank you enough as I have been lusting over this forever and just could not settle down and tat it. Do not know what you said, but you got through my “tatting block”. Finally!
I had printed off the three Priscilla books over a year ago, so it has been at least that long!
Now – a question. In the pattern it says to “leave a space”. I do not understand why I should be doing that as space does not seem to be needed. Do you understand what I mean?
Fox : )
admin Said,
January 18, 2011 @ 11:06 am
Hi Fox,
So glad it’s working out for you. I’ve had these books printed out for a while but had been spending more of my time flipping through them than actually tatting from them. That’s sort of why I wanted to try this project this year.
If I understand what you mean, the space it’s referring to is just the space between the tatted chain you’ve just finished and the shuttle join to the picot on the previous round. You end up covering the space up with the knot stitch so in the end that space won’t show.
Is that the part of the instructions you were referring to?
Fox Said,
January 18, 2011 @ 1:54 pm
Hi!
Yes. Thanks.
That seems a rather strange instruction, as I did not leave space and it is fine. but it doesn’t matter! I am nearly done!
Because of this pattern. I have pulled out all the books and am now enthralled with them. I can see why you chose to do some work on the vintage stuff. Thanks for helping me to see the patterns in a whole new way. Something has shifted in me as to my appreciation of these books.
Fox ; )
Fox Said,
January 18, 2011 @ 2:08 pm
Aha — I was very wrong! This spaces are necessary! Gotta do the whole thing over, but now I get it! I NEVER get things right the first time! : O
admin Said,
January 18, 2011 @ 2:26 pm
Hi Fox,
I was trying to figure out how you could do it without leaving spaces. Getting that length right is one of the harder parts for me since it looks funny if you leave too much space. I’ve started leaving less space than I think I need because it seems easier to stretch it out and add another stitch if necessary than to have it be too long.
Next time I do this motif I’m going to take pictures of it along the way. I think that will help make it a lot more clear. Glad it’s working out for you!
Fox Said,
January 18, 2011 @ 2:58 pm
Do you reverse???
admin Said,
January 19, 2011 @ 8:48 pm
Hi Fox, Do you mean between rounds? I don’t remember for sure, but looking at it again, I don’t think so.
Fox Said,
January 20, 2011 @ 7:25 pm
It’s okay! I did; it turned out splendidly. Will post tomorrow or the next day. Thanks for all your help. Would not have done this without you. I am pleased to have learned how to do that knot stitch… finally!
Fox : )
admin Said,
January 21, 2011 @ 6:14 pm
Awesome! I don’t know that I did much to help, but I’m glad it’s working out for you! Are you going to do the whole 109 of them to make the doily in the book? It does look pretty cool.
Maureen Said,
January 23, 2011 @ 1:55 am
Fox sent me here- I love your blog!
admin Said,
January 23, 2011 @ 8:37 am
Thanks Maureen! And thanks Fox!
Fox Said,
January 24, 2011 @ 7:57 am
109? After I see yours, maybe… Fox : ))
admin Said,
January 24, 2011 @ 9:14 am
Fair enough.
Judy Said,
January 25, 2011 @ 11:54 pm
I am not a good enough shuttle tatter to begin to do this. I’m still trying to work out how to do it with a needle.
I’ve gotten instruction, but I think I still have a block like Fox did. Congrats to the two of you. I love vintage, but this one has defeated me so far.
admin Said,
January 26, 2011 @ 7:49 am
If you can do split chains you can figure this out. If you can’t do split chains then you’re better off learning those first because they’re a lot more useful. This whole pattern could actually be done with split chains instead of the knot stitch and turn out just as nice. You can only tell the difference when you look at it real close.